
Are you going to put down new flooring or tiles in your home or office? But before you do that, you have to level the concrete floor first. It doesn’t matter if you have a concrete resurfacing Sydney slab or an old floor with cracks and dips; it’s important to make sure it’s level for a smooth, long-lasting finish.
This guide will show you the appropriate way on how to level concrete floor, what tools you’ll need, and common mistakes to avoid. We will also discuss how experts like Civilcraft can help you do it perfectly the first time.
Why is Concrete Floor Levelling So Important?
Many individuals think that the tiler or flooring installer would “fix things along the way,” however uneven concrete can cause:
- Cracked tiles
- Premature wear and tear
- Bouncy or creaky flooring
- Water pooling and poor drainage
Whether you’re installing vinyl planks, carpet, engineered timber, or ceramic tiles, a level base is key to both appearance and performance.
How to Level Concrete Floor Before Tiling: Step-by-Step
Let’s understand the process of leveling concrete floors:
1. Assess the Surface
Before doing anything, assess the slab. Use a long spirit level or laser level to check for:
- High spots or ridges
- Low spots or hollows
- Dusty or crumbling areas
- Hairline or structural cracks
Mark these spots clearly with chalk.
2. Clean the Floor Thoroughly
- Get rid of all the dust, filth, debris, and paint that is left over. A dirty surface will prevent things from sticking together. If there is grease or oil, use a degreaser or floor grinder. If your flooring is older, you might need to sand out old glue.
3. Repair Cracks and Dents
- Fill in small cracks using a patching product or concrete filler. If the structure is damaged, call a construct civil specialist. Before you move on, let the filler dry completely.
4. Prime the Surface
- A concrete primer, which is sometimes termed a bonding agent, helps the slab and levelling compound stick together better. Pick a primer that works with the compound you’re using. Most of the time, water-based or epoxy-based primers are employed. Let it dry according to the directions on the package.
5. Mix and Pour Self-Levelling Compound
Self-levelling compounds are your best bet for DIYers and tradies alike. They’re quick, efficient, and flow smoothly to fill dips.
- Mix the compound with water in a bucket using a paddle mixer
- Start pouring at the lowest point of the floor
- Use a spreader or gauge rake to move it evenly
- Remove air bubbles using a spiked roller
Let it settle and cure. It usually takes 24 to 48 hours, depending on product and weather.
Common Mistakes to Avoid
- Not sealing cracks first: Leads to leaks or patch failures
- Pouring without priming: Compound won’t bond properly
- Overwatering the mix: Weakens strength and self-levelling ability
- Skipping floor preparation: Dust or residues weaken the surface
- Rushing the cure time: Always let the surface cure fully before tiling
Can You Do It Yourself?
Yes, however, it depends on how sure you are and how big the area is. Self-levelling can be done by yourself for minor household works with small dips. But for big commercial jobs, uneven slabs, or garage flooring, it’s advisable to hire professionals like Civilcraft.
What If the Floor Has Major Damage?
If the concrete slab is old, cracked, or falling apart, concrete resurfacing* may be a better option than fixing it. It is especially typical in Sydney homes where the floors have gotten worse over time or because of the weather. That’s where services like “concrete resurfacing in Sydney” come in. It not only makes the floor level, but it also gives it a new life.
How Civilcraft Can Help
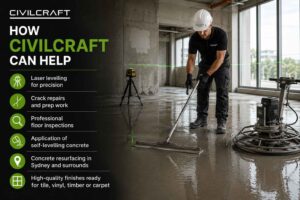
At Civilcraft, we’ve helped hundreds of Australian homes and commercial spaces get floors levelled and ready for tiling or installation. Whether it’s new construction or an older slab that needs attention, we offer:
- Laser levelling for precision
- Crack repairs and prep work
- Professional floor inspections
- Application of self-levelling concrete
- Concrete resurfacing in Sydney and surrounds
- High-quality finishes ready for tile, vinyl, timber or carpet
We’re a brand known for transparency, durable work, and on-time completion. Our team works closely with flooring installers to ensure the surface is perfect, saving you money on repairs later.
Also Read:- Top Benefits of Hiring Commercial Cleaning Services Sydney for Road and Infrastructure Cleaning
Final Thoughts
When it comes to how to level concrete floor, cutting corners will cost you later. A properly levelled floor means:
- No unexpected tile cracks
- Better adhesion and finish
- Longer lifespan for your new floor
- Easier, quicker flooring installation
If you’re in Sydney or the surrounding areas and need expert help, Civilcraft is just a call away. We’ll level your floor, prep it, and prepare it for whatever surface you want to install. Want professional help levelling your floor? Contact Civilcraft today for a quote and get your tiling project started on solid ground.
FAQs
Q: How do I know if my concrete floor needs levelling?
Ans: If you notice uneven tiles, pooling water, or bouncy flooring, those are key signs. A spirit level or laser level can confirm it.
Q: Is it possible to tile directly over a rough concrete floor?
Ans: No. Tiles might fracture or come free over time if the concrete is uneven or broken. First, make sure the surface is levelled.
Q: How much does it cost to level a concrete floor in Australia?
Ans: The price depends on the size, condition, and method. Concrete floor levelling usually costs between AUD 25 and AUD 70 per square meter. To acquire a more exact quote, please contact Civilcraft.
Q: What’s the difference between levelling and resurfacing?
Ans: Levelling focuses on creating a flat base for tiling, while concrete resurfacing also improves appearance, durability, and structural quality making it ideal for older or damaged floors.
Q: How long should I wait after levelling to install tiles?
Ans: It depends on the product used. Most self-levelling compounds require 24 to 48 hours of curing. Always check the product label.