
Let’s talk about that one thing we all notice but try to ignore until it’s too late: the driveway. You know the drill—you’re pulling the pickup in after a long day, or maybe you’re just heading out to grab a flat white, and you see it. A little hairline fracture. Then a zig-zag.
Before you know it, your pristine slab looks like a giant spiderweb. In Australia, our driveways take an absolute beating. Between the scorching sun that could fry an egg on the pavement and those sudden winter deluges, our concrete is constantly expanding and contracting.
It’s no wonder concrete repair cracks are one of the most searched DIY topics for homeowners from Perth to Sydney. But don’t stress! You don’t need to rip up the whole thing and start from scratch.
Most driveway issues can be sorted with a bit of “elbow grease” and the right know-how. Let’s dive into how you can save your driveway and keep your curb appeal looking top-notch.
Why is My Concrete Cracking Anyway?
Before we jump into the “how-to,” let’s look at the “why.” In the Australian climate, a few things are usually at play:
- Soil Movement:- If you live in an area with reactive clay (Western Sydney and parts of Victoria), the ground beneath your house literally breathes. It swells when wet and shrinks when dry, leaving your driveway unsupported.
- The Heat:- Concrete expands when it’s hot. If there aren’t enough expansion joints (those little gaps between slabs), the concrete has nowhere to go but up or out, causing it to snap.
- Heavy Loads:- If you’ve started parking a heavy boat or a new caravan on a slab that wasn’t reinforced for it, you might start seeing some protest lines.
- Thirsty Trees:- We love our gum trees, but their roots are notorious for sneaking under driveways and lifting the concrete.
Step-by-Step: DIY Concrete Repair Cracks
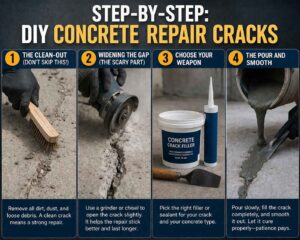
If the cracks are small (think thinner than a credit card), you can usually tackle these yourself over a weekend. Here’s a simple guide to getting it done:
1. The Clean-Out (Don’t Skip This!)
- You can’t just pour filler over dirt. Use a wire brush or a screwdriver to rake out any loose debris, weeds, or old filler. Follow up with a high-pressure hose or a leaf blower. If the crack is oily, use a degreaser. The filler needs a clean surface to “bite” onto.
2. Widening the Gap (The Scary Part)
- It sounds counterintuitive, but sometimes you need to make the crack a little wider at the top to give the repair material more surface area to bond with. A small hammer and chisel can help create a “V” shape.
3. Choose Your Weapon
For concrete repair cracks, you’ve got two main choices:
- Concrete Liquid Filler: Great for thin cracks. It’s thin enough to sink deep into the gap.
- Textured Caulk: Best for wider cracks. It stays flexible, which is vital in Australia because it allows the concrete to move slightly without the repair popping back out.
4. The Pour and Smooth
- Fill the crack slightly higher than the surface, as most fillers shrink a little as they dry. Use a trowel or even an old knife to smooth it over. If you want it to blend in, you can sprinkle a little dry sand over the wet filler to match the texture of the surrounding concrete.
When DIY Isn’t Enough: Bringing in the Big Shots
Sometimes, a tube of filler from the hardware store just won’t cut it. If your driveway is sinking, shifting, or the cracks are wide enough to fit a finger in, you’re looking at structural issues. This is where professional help becomes a lifesaver—not just for the finish, but for the longevity of your home.
How Civilcraft Can Help
If you’re looking for a permanent solution rather than a temporary Band-Aid, Civilcraft is the name to know. They specialise in high-quality civil works and concrete remediation. While a DIY fix might last a season, Civilcraft looks at the root cause.
We Can Help by:
- Professional Assessment: Determining if the crack is just cosmetic or a sign of sub-grade failure.
- Specialised Equipment: Using industrial-grade resins and concrete compounds that are designed to withstand the harsh Australian sun.
- Large Scale Repairs: If you have a massive driveway or a commercial space, they have the manpower to get the job done quickly and correctly.
- Structural Grouting: If your driveway has hollow spots underneath, they can inject specialised grout to stabilise the ground, preventing future cracks.
Maintenance of Concrete
Once you’ve sorted your concrete repair cracks, you want to make sure they don’t come back.
- Seal It: Apply a high-quality concrete sealer every 2–3 years.6 It’s like sunscreen for your driveway.
- Manage Water: Ensure your gutters and downpipes aren’t dumping water right next to the edge of your driveway.
- Tree Trimming: Keep an eye on nearby roots. Sometimes, a root barrier installed along the edge of the driveway can save you thousands in future repairs.
Conclusion
Your driveway is the “red carpet” to your home. Taking the time to handle concrete repair cracks now will save you a massive headache (and a lighter wallet) down the track. Whether you’re grabbing a caulking gun yourself or calling in the experts, your home will thank you for it!
FAQs
Q:- Can I use regular cement to fill cracks?
Ans:- Not really. Plain cement doesn’t bond well to old concrete and will likely crack again within weeks. Use a dedicated concrete repair filler.
Q:- When is a crack “too big” to fix myself?
Ans:- If one side of the crack is higher than the other (a “trip hazard”), it’s a sign of soil movement. Call a pro like Civilcraft.
Q:- Does the weather matter when I fix concrete cracks?
Ans:- Yes! Don’t do it on a 40°C day or if rain is forecast. Aim for a dry, mild day so the filler cures slowly and strongly.
Q:- How long does a repair take to dry?
Ans:- Most liquid fillers are “touch dry” in a few hours, but wait at least 24 hours before driving your car over them.
Q:- Is a cracked driveway a safety issue?
Ans:- It can be! Aside from being a trip hazard, cracks allow water to seep under your house foundation, which can lead to much more expensive repairs later on.